BioPod 1.0
This project combines my interests in terrariums and science fiction in the first of what I hope to be a series of increasingly complex projects.
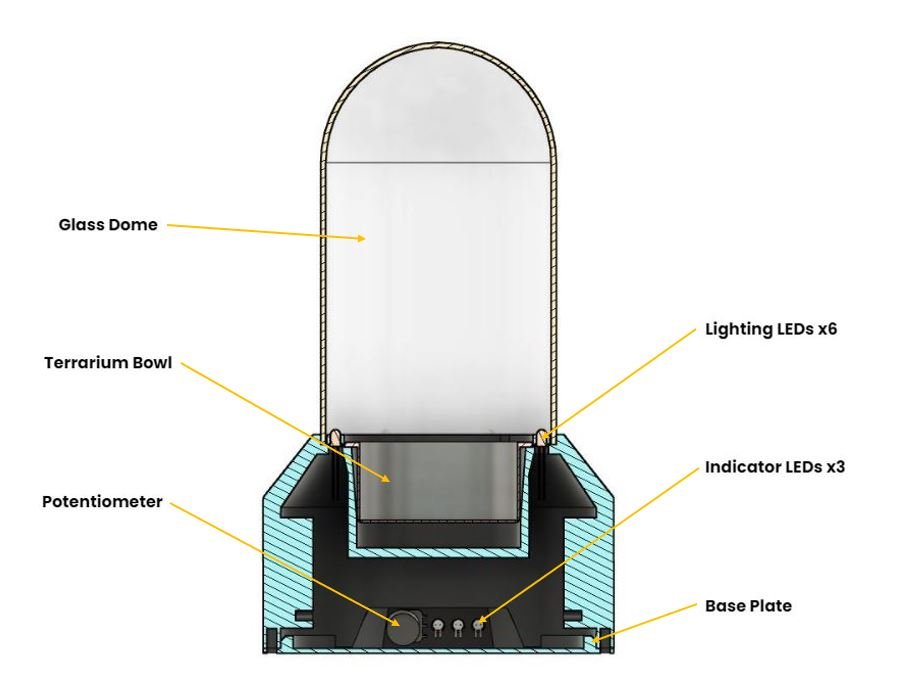
This first “BioPod” as I am calling them for now, is very simple. It features some dimmable LED’s to light the terrarium and a few colored LED’s on the “control panel” that blink and alternate in vaguely “sci-fi” ways.
The design is made to be compatible with Arduino microcontrollers because in future versions I hope to implement functionality such as soil moisture, humidity, and light sensors as well as automating the watering and light controls. I also hope to further develop the sci-fi aesthetic of the design. This design is not meant to be permanently sealed, but as my terrarium making skills develop future versions might be.
The CAD was all done in Fusion 360, this is my first full project completed on the software. The body was 3D printed, the glass dome came from a thrift store, and the other components were scavenged from various locations.

Design:
The idea for this project all came from this one little doodle I made.


Over the next few days I found myself returning to the concept whenever I was sketching.

Then I went about doing some initial sketching for my first prototype. I based the design on a terrarium I already had growing underneath the thrifted glass dome. While that terrarium had been growing well, I wasn’t happy with its aesthetic because it was being housed in upcycled takeout containers. This was the perfect opportunity to give it the upgrade it deserved.
I wanted to implement functionality including sensors, LCD display, indicator LEDs, etc. but ended up deciding to dial back my ambition and focus on creating a simple prototype version that would be more feasible to get done in a short time frame.
With these basic ideas and measurements in hand I went into Fusion 360 and designed the first prototype.
Eventually I drew enough of them that I decided I wanted to make one for real.


Fabrication:
Once I had the CAD model completed, I began the fabrication process by 3D printing the main body out of PLA. This was the largest single print I have done to date on my Prusa i3mk3, so I was excited to see it turned out well, despite running out of filament halfway through the print.
This design used almost 600g of filament, a detail which I did not notice until after printing began. If I do another iteration on this design I will heavily optimize the design and print setup to reduce the amount of filament used.
After the print was complete, I fixed up a few tolerance issues using hand tools and a Dremel. Next time I run a print of this size I will pay extra attention to triple checking my measurements before printing.

In between layers of paint drying I laid out the basic electronics on my Arduino prototyping breadboard. This circuit is clearly quite simple, and certainly dos not require an Arduino to achieve desired functionality. However, since future versions will feature more complex electronics, I wanted to have the microcontroller integrated from the beginning.


After resolving the tolerance issues I give the print a light sanding, several coats of black spray paint, and a few layers of clearcoat to protect the paintjob. I applied extra layers of clearcoat to the terrarium bowl area in an effort to keep moisture from reaching the electronics.
This was my fist time painting a FDM printed part. As a result of my inexperience I was not quite happy with the finish I achieved. In future versions I will be much more diligent with my sanding, fill any large gaps with some kind of filler, and get to a much higher grit paper before painting.

With that working as intended I got started wiring, soldering, an hot gluing all of the electronics into their final homes. It has been quite a while since I had worked with electronics, I am hoping as I do more my cable management will improve.
With the electronics completed, all that was left was to attach the baseplate, insert the terrarium, secure the glass dome, and power it on.